If you are building a SaaS website that has awesome features or a simple website with minimal user functionality, you know Authentication and Authorization are crucial (difference between authentication and authorization). Protected Routes in Next.js help us ensure that unauthenticated users are not able to see routes/pages intended for logged in (authenticated) users. There are a few approaches to to implement Protected Routes in Next.js, i.e., enforce authentication for a page/route.
But, first of all – why do we love Next.js? Next.js is arguably the most popular and go-to React framework. It packs some cool stuff including file-based routing, incremental static regeneration, and internationalization (i18n). With Next.js 13, we have got even more power – layouts and Turbopack!
You might be wondering – why bother protecting routes? We are building a SaaS product with a Next.js frontend and Nest.js backend. We have implemented authentication in the backend but we also need to ensure that forced browsing* is prevented and User Experience is enriched. Actual authentication logic should reside inside our back-end logic. All the API calls must be appropriately authenticated. In our app, whenever there is an unauthenticated request it returns 401 Unauthorized. An ACL is also in place so whenever user requests a resource they do not have access to, the backend returns 403 Forbidden.
Now, let’s create a route protection flow in Next.js.:
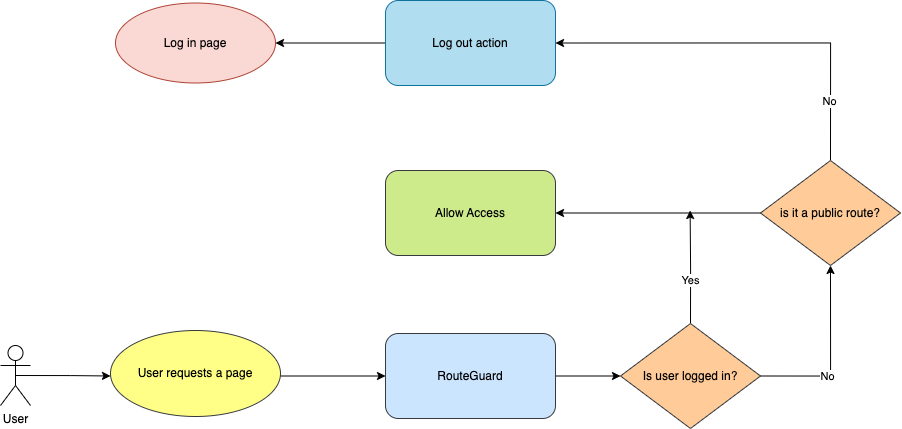
– If a user requests a protected route (something that requires authentication), we redirect them to the login page.
– We should not prevent access if a route is public (supposed to be viewed regardless of the users’ authentication state) like a login page.
At the end, the goals are simple: safety and security.
Jodi Rell
Using RouteGuard
The concept of a RouteGuard is simple. It is a wrapper component that checks whether the user has access to the requested page on every route change. To track the access, we use one states: authorized. If authorized is true, then the user may see the page or else user is redirected to the login page. To update the state, we have a function authCheck() which prevents access (sets authorized to false) if the user does not have access and the page is not public (e.g. landing page, login page, sign-up page).
import { Flex, Spinner } from '@chakra-ui/react';
import { useRouter } from 'next/router';
import publicPaths from '../data/publicPaths';
import { useAppDispatch, useAppSelector } from '../hooks/storeHooks';
import { setRedirectLink } from '../redux/AuthSlice';
import {
  JSXElementConstructor,
  ReactElement,
  useEffect,
  useState,
} from 'react';

const RouteGuard = (props: {
  children: ReactElement<unknown, string | JSXElementConstructor<unknown>>;
}) => {
  const { children } = props;

  const router = useRouter();
  const [authorized, setAuthorized] = useState(false);
  const user = useAppSelector((state) => state.auth);

  const dispatch = useAppDispatch();

  useEffect(() => {
    const authCheck = () => {
      if (
        !user.isLoggedIn &&
        !publicPaths.includes(router.asPath.split('?')[0])
      ) {
        setAuthorized(false);
        dispatch(setRedirectLink({ goto: router.asPath }));
        void router.push({
          pathname: '/login',
        });
      } else {
        setAuthorized(true);
      }
    };

    authCheck();

    const preventAccess = () => setAuthorized(false);

    router.events.on('routeChangeStart', preventAccess);
    router.events.on('routeChangeComplete', authCheck);

    return () => {
      router.events.off('routeChangeStart', preventAccess);
      router.events.off('routeChangeComplete', authCheck);
    };
  }, [dispatch, router, router.events, user]);

  return authorized ? (
    children
  ) : (
    <Flex h="100vh" w="100vw" justifyContent="center" alignItems="center">
      <Spinner size="xl" />
    </Flex>
  );
};

export default RouteGuard;
Note: we are using Redux to store the user’s data; authentication is out of the scope of this blog post.
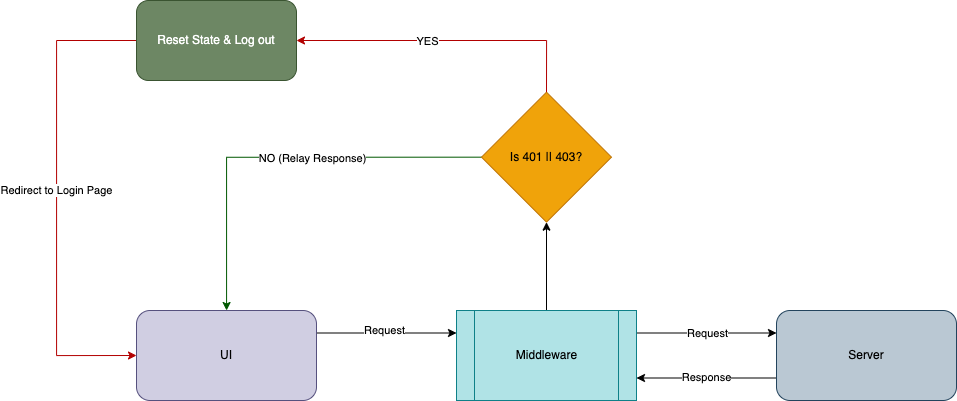
Implementing the Middleware
In a scenario where the users’ session expires while they are on a protected page, they will not be able to fetch newer resources (or perform any actions for that matter). That’s, once again, really bad UX. We cannot expect a user to refresh, so we need a way to let them know that their session is no longer valid.
To implement the same, we will use another awesome Next.js feature – Middlewares! In few words, a middleware sits between your server and the frontend. Middleware allows you to run code before a request is completed, then based on the incoming request, you can modify the response by rewriting, redirecting, modifying the request or response headers, or responding directly.
After session expiration, whenever the user makes a request, it will result in 401 Unauthorized. We have implemented a middleware which listens to the response for each request that is being made from the frontend; if the request results in 401 Unauthorized, we dispatch the same action, i.e. log out the user and redirect to the login page.
import {
  MiddlewareAPI,
  isRejectedWithValue,
  Middleware,
} from '@reduxjs/toolkit';
import { logout } from '../redux/AuthSlice';
import { store } from '../redux/store';

interface ActionType {
  type: string;
  payload: { status: number };
  meta: {};
  error: {};
}

const unauthenticatedInterceptor: Middleware =
  (_api: MiddlewareAPI) =>
  (next: (action: ActionType) => unknown) =>
  (action: ActionType) => {
    if (isRejectedWithValue(action)) {
      if (action.payload.status === 401 || action.payload.status === 403) {
        console.error('MIDDLEWARE: Unauthorized/Unauthenticated [Invalid token]');
        store.dispatch(logout());
      }
    }

    return next(action);
  };

export default unauthenticatedInterceptor;
Suggested Readings
- NextAuth.js – https://github.com/nextauthjs/next-auth-example
Leave a Reply